CTD-Rosette


CTD Operations
1304_ctddeploy500.png
http://web.calcofi.com/images/photos/CTD-Rosette/1304_ctddeploy500.png
ctd_open500.png
http://web.calcofi.com/images/photos/CTD-Rosette/ctd_open500.png
CTD_DowncastProfile.png
http://web.calcofi.com/images/photos/CTD-Rosette/CTD_DowncastProfile.png
CTD_ReturnsToSurfaceFull.png
http://web.calcofi.com/images/photos/CTD-Rosette/CTD_ReturnsToSurfaceFull.png
ctd_closed500.png
http://web.calcofi.com/images/photos/CTD-Rosette/ctd_closed500.png
CTD_Sampling2G.png
http://web.calcofi.com/images/photos/CTD-Rosette/CTD_Sampling2G.png
1210_Sta93_110_ProdoSamp2.png
http://web.calcofi.com/images/photos/CTD-Rosette/1210_Sta93_110_ProdoSamp2.png
OxygenSamplePickling.png
http://web.calcofi.com/images/photos/CTD-Rosette/OxygenSamplePickling.png
CTD_Electronics500.png
http://web.calcofi.com/images/photos/CTD-Rosette/CTD_Electronics500.png
CalCOFI employs some routine practices to keep our CTD generating the best data possible. This page summarizes some of the common practices and recommendations.
Background
SIO-CalCOFI has deployed a Seabird 911 CTD since early 1990, with Seabird techs, early on fine-tuning the system on RV New Horizon CalCOFI cruises. Initially, the system was passive flow, not pumped which generated a lot of noise as the ship rolled. Once Seabird developed an inline pump that stabilized the movement of seawater through the system regardless on wire speed or ship roll. The data quality improved so much that CalCOFI replaced hanging individual sampling bottles on wire with a 24-bottle CTD-rosette. Still, the conversion was gradual, with the CTD-rosette initially replacing only the daily 6-bottle primary productivity cast. The reliability of using computers in 1990-1993 tethered to electronic instrumentation via conductive winch wire needed thorough testing. After sea trials on several cruises over three years, CalCOFI adopted the CTD-rosette for all station work on CalCOFI 9308NH.
CTD standard practices have evolved over the last 25 years especially with improvements in sensor technology and computer software & processing power. Actually, the core CTD & sensor hardware has not changed that much except in response time. But new sensors such as profiling pH and ISUS-Nitrate sensors have expanded our suite of measurements
Practices
CTD Sensor Calibration & Upkeep - in the past, we would routinely send our sensors to Seabird for calibration every six months - after every two cruises. Although Seabird typically recommends annually servicing sensors, we felt the performance of the sensors was critically important. With the overall cost of cruises, it's a relatively small expense to send in our sensors every 6mos. The cost and turn-around time has been increasing each year so, overtime, the six month/two cruise practice has softened. As predicted by Seabird, temperature sensors are very reliable and annual calibrations are probably adequate. Same with conductivity sensors although I am less confident they can go an entire year. Fortunately CalCOFI collects seawater samples to calibrate any drift over time. More on this later but the point being, if you take seawater samples that can be used to calibrate your sensors, servicing sensors may be done less often.
Our current standard sensor deployment practice is to rotate our sensors from primary to secondary after two cruises if they are performing up to our standard (agreement with calibration samples).
- A freshly calibrated temperature sensor is installed on a cruise, along with a fresh conductivity and oxygen sensor, plumbed inline with a pump. If the sensor array perform well for the entire cruise, usually 75-105 casts, they stay mounted as primaries for the next cruise.
- After two cruises, if the primary sensor array still agrees well with bottle samples or, at least, have a consistent offset, they become the secondary sensor array (CalCOFI runs dual T, C, O2 arrays).
- The secondary sensors are removed and, time-permitting (based on the amount of time between cruises), are sent in for service and calibration. CalCOFI has three sets of sensors so there are always a spare set at sea to replace failing sensors.
- New primary temperature, conductivity, and oxygen sensors are installed. They stay as primary for two cruises and if still performing well, are shifted to secondary. And the rotation cycle continues...
- If a sensor stops working or start generating questionable data, it is removed and replaced with a spare if possible.
- Both primary & secondary sensor arrays are flushed with DI water after every cast to reduce biofouling and keep sensors performing well.
- At the end of the cruise, a dilute solution of Triton or ABS flushes the system, stay in the system plumbing for 30-60mins, then is thoroughly flushed out with DI water for storage. DI water flushes are performed periodically between cruises to keep the sensor wet.
CalCOFI performs seawater sample analyses at-sea so have the luxury of relatively quick & numerous data quality checks. The data acquisition & processing software compares CTD preliminary data to bottle data so problems can be identified quickly. I would recommend, if you do not collect seawater calibration samples to be extra vigilant monitoring the sensor data. Hopefully, you can run two sets and check agreement between primary and secondary T, S, & O2. If you can only run a single set of sensors, I would recommend calibrating your conductivity and oxygen (SBE43) sensors more frequently since they are much more sensitive than temperature sensors. Oxygen optode sensors are recommended if oxygen bottle samples are not collected.
Pylon Carousel
CalCOFI uses Seabird SBE32 24-trigger pylons. When mistrips occur, we perform trigger maintenance and replacement to avoid switching pylons. A freshwater deck hose is used to throughly rinse the carousel crown after each cast to minimize biofouling between casts.
- Trigger maintenance and rebuilding are common practices and performed before each cruise.
- Spare triggers - either new or rebuilt - are kept on-hand at-sea so they can easily replace unreliable triggers.
- Usually, if a bottle mistrips, the trigger will be cleaned with a Q-Tip, checking for biofouling, rust or paint chips.
-
If it mistrips consecutively more than once after servicing or lanyard re-rigging, the trigger is replaced.
- First, inspect the lanyard rigging and change it if potentially the problem. Rigging the lanyard on the left of right side of the bottle can change the lanyard's angle to the trigger; pulling the trigger offcenter can cause the trigger to bind so rigging the lanyard as true as possible to the trigger throw will improve reliability.
- Second, if the lanyard rigging does not appear to be the problem, remove the carousel "crown", disassemble and install a new trigger, replacing the unreliable one. Reassemble and carefully reinstall the crown and test. If the problem persists, or you do not feel comfortable disassembling the crown. You can swap the entire crown with the backup pylon's crown or swap pylons.
CTD "Fish"
SIO-CalCOFI deploys a 24-10L bottle epoxy-coated CTD-rosette on all stations. The SBE9+ "fish" is mounted horizontally on the lower rosette frame using stainless steel hose-clamps. The dual pumped T, C, O2 sensor arrays are mounted horizontally on opposing sides of the anodized CTD case. The two pumps are configured so their exhaust ports are roughly the same level as the temperature sensor intakes. This is important to minimize any pressure differential between intake and output when moving through the water column at 60m/min.
Our regular deployment practice is to start data acquistion by powering the deck unit ON while the system is still on deck, logging deck pressure. The CTD-rosette is then deploy it into the ocean, send it down 10m to compress & blow the air out of the tubing. The pumps are powered on when seawater contacts the primary conductivity sensor after ~45secs. It is important to monitor the pump status in Seasoft and not start data acquisition unless the pumps are running. After 2 mins at 10m and the pump status reads "ON", the CTD-rosette is brought back to "just below surface", usually ~2m if conditions permit. Avoid the roseete popping out of the water during bigger ship rolls or else the pumps will turn off and you'll have to repeat the 10m dip. Once at surface, data archiving is initiated in Seasoft, noisy screen plot profiles erased, and ~45-60secs of data acquired. If everything looks good, sensor pairs agree, the CTD-rosette is send to terminal depth (usually 515m, depth permitting or within 10m of bottom). The winch speed is 30m/min for the first 100m then, weather/sea state permitting, increased to 60m/min to terminal depth. The sensors are optimized for 60m/min (1m/sec) so be sure not to go faster than that.
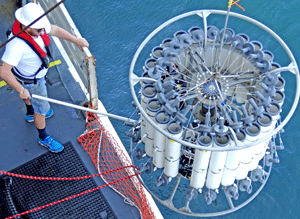 Since August 1993, CalCOFI has deployed a 24 bottle CTD-Rosette. The CTD-Rosette consists of two integrated components: the Seabird 911+ CTD electronic sensor array and carousel surrounded by a ring of 24-10 liter PVC bottles that collect seawater at various depths.
The Seabird 911+ CTD electronic sensor array sends real-time data to a shipboard computer via the winch's conductive wire. As the CTD-Rosette is lowered, depth profiles of several sensor measurements display on the CTD computer screen. Based on the downcast profiles, the 10 liter bottles are closed at target depths as the CTD-Rosette is brought back to surface, trapping seawater for analysis.
The CTD-Rosette is typically lowered to terminal depth of 515 meter (1690 feet), bottom-depth permitting. On basin stations or stations less than 515 meters, it is routinely deployed within ~10 meters from the seafloor. To improve the  sampling resolution in areas with significant hydrological and biological gradients, the CTD-Rosette is lowered a speed of ~30 m/min for the first 100 m then ~60 m/min to depth without stopping. During retrieval, the CTD-Rosette stops for at least 20 seconds at target bottle depths to adequately flush the 10 liter sample bottle prior to closure. Seawater samples are analyzed onboard for salinity, oxygen, nutrients & chl and are used to cross-check & correct matching depth CTD sensor measurements.
| Seabird 911+ CTD Sensors & Rosette Bottle Samples | |
| CTD Sensors: | Seawater Samples: |
| Temperature x 2 | Salinity |
| Conductivity x 2 | Oxygen |
| Oxygen x 2 | Nutrients |
| Fluorescence | 14C Primary Productivity |
| Transmissometer | Chlorophyll-a/Phaeopigments |
| PAR | Dissolved Inorganic Carbon (DIC) & pCO2-pH |
| pH | NCOG |
| ISUS Nitrate | HPLC |
| Altimeter | LTER Additional Sampling |
 CalCOFI collects vertical profile data using Sea-bird Scientific software (Seasave V7) and a Seabird 911plusV2 CTD and deck unit. Our SBE 911plus CTD system includes: 9plus Underwater Unit and a 11plus V2 Deck Unit.
Current sensor complement includes:
|
• Dual Temperature - SBE 3plus |
• pH Sensor - SBE 18 |
Seabird CTD-Carousel Setup & Deck Unit Diagnostics
(pdf version)
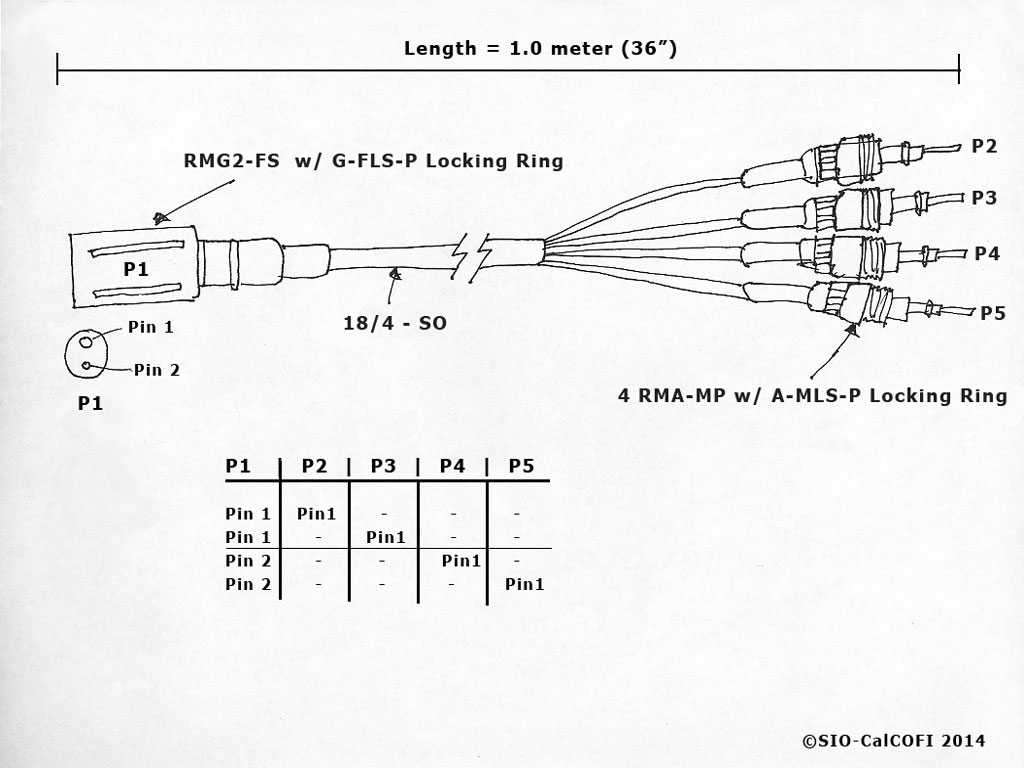
 SIO-CalCOFI’s method of terminating the sea cable uses a 4-pin custom pig-tail to terminate a multi-strand conductive wire that allows each individual conductor to be used in any combination. Terminating the sea cable using this technique may be viewed on in the CalCOFI Handbook: CTD Termination Section.
Conventional two-pin Seabird pigtail terminations are standard on NOAA vessels and usually performed by the ET. So interfacing the CTD deck unit only requires the attachment of the sea cable to the deck unit. This is done by connecting a two-conductor wire or a coaxial cable equipped with MS3106A connector, from the winch junction box in the CTD lab to the Sea Cable port on the back of the deck unit.
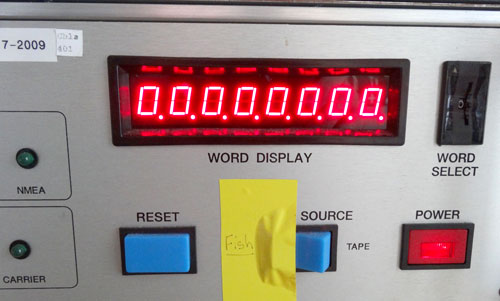
Once the sea cable is connected to the Seabird 9+ and Seabird 11 deck unit, the deck unit can be powered on. If cabled properly and all electronics are functioning, the numeric LED panel of the deck unit should display non-zero numbers. These values are different for each channel which can be selected by rotating the Word Select dial to the right of the LED panel.
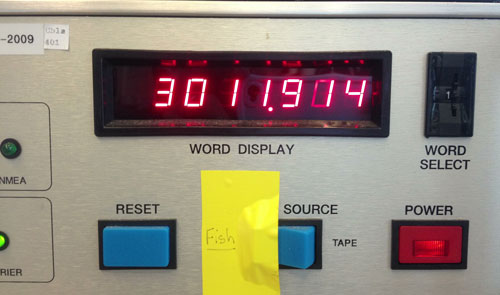
If the LED panel displays “0.0.0.0.0.0.0.0” then the deck unit and CTD “fish” are not handshaking correctly. Turn the deck unit off and wait 60secs before touching any exposed wire. Typically, with only two pins, the problem is reversed polarity so switching the wires in the junction box will correct this issue. Please note that powering on the deck unit with reversed polarity may blow the fuse(s). So after switching the wires and before re-powering on the deck unit, check both the 1/2A and 2A fuses on the back of the deck unit & replace if necessary. It is prudent to keep a good supply of these fuses on hand. Power on the deck unit and hopefully, the LED panel has numbers.
Please note in the photos, yellow tape is used to keep the deck unit Signal Source set to Fish. If the switch is toggled to Tape, the deck unit will not communicate with the CTD. The yellow tape prevents the switch from changing from Fish to Tape unintentionally.
Read more of CTD Setup & Diagnostics Instructions
CTD Operator’s Duty List
(CTDOperator Duty List2017.doc 08/09/2017 - CURRENT VERSION)
These instructions are designed for use by CalCOFI CTD operators and describe our step-by-step protocol for CTD operations at sea. They outline our preferred method but are not considered "gospel" - there are many techniques that result in good data from the Seabird 911+ CTD. But based on our long history of using Seabird hardware & software, we've established these guidelines for our CTD operators to follow. Standardizing our methodology between operator improves our data continuity, format consistency, and makes problems with our system easier to catch.
1). CTD Prep: ~20 minutes before station arrival, rally the troops for CTD prep. If weather-decks are secured because of rough weather, wait until arrival to station.
- Rig the bottles open, lanyards right, bottom caps left; bottles left of stanchions (5, 11, 17 & 23; with extra lanyard extension loops) should be rigged lanyards left, bottom caps left; tighten breathers valves finger-tight, pull spigots out to close then rotate off pins. Note: bottle valves should be oriented at "4 o'clock" to allow bottom caps to angle to the left easily and easy access for seawater sampling.
- Pull pump DI rinse tubes, uncap PAR & pH sensors; rinse the transmissometer optics with RBS (squirt bottle).
- Plug in the ISUS battery ~15mins before cast - this can be done when bottles are being prep but postpone if secchi cast or net tows are first. Unplug the battery is there is going to be a delay of more than 20mins.
2). Prep Seasave on CTD Computer:
- ~15 minutes before cast, power-up the CTD deck unit and start data acquisition in Seasave without archiving data to file. Carefully verify the Cast ### & data filename (YYMM###) and directory are correct. Data files are moved & stored in the ‘archive’ dir but data should not be acquired there or the ctdbackup utility will not be able to find the files. Leaving the "Not archiving data" dialog box on-screen as a reminder data are not being archived is highly recommended.
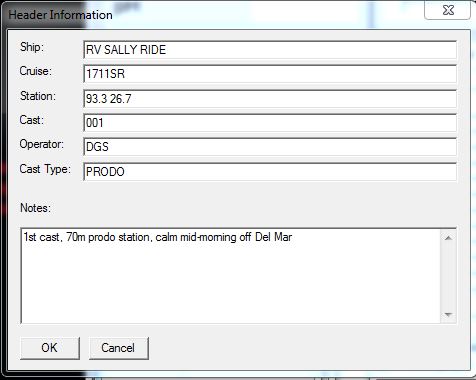 Fill out the Seasave header form – be sure to use the long version of line and sta (ie 93.3 45.0, not 93.45). Add any comments that might be worth noting or effect data processing such as calm or rough weather, rain, equipment changes, or any startup glitches. Be sure to triple-check the ‘Station#’, ‘Cast #’ and ‘Cast Type’ (ROS, PRODO, SCCOOS) are correct.
- Connect the ISUS battery if not already connected. After letting the deck unit & CTD electronics warm up for several minutes, log the lowest deck pressure on the station sequence (“cheat sheet”) clipboard or console ops form.
3). Upon station arrival:
- Work vests & hard hats are required for everyone participating in deck ops
- Ready the launch of the CTD if it is the first operation - secchi or nets may be 1st on morning prodo station. If CTD ops are 1st then untie/unstrap the CTD from deck eyes.
- Double-check the tubes are pull, sensors uncapped, ISUS battery plugged-in
- On SIO vessels:
- The restech or watchleader requests permission from the bridge to launch the CTD after checking the ocean surface for hazards (kelp, oil or diesel slicks for example)
- With permission granted, instruct the winch operator to engage the auto-deployment (on ships with LARS like RV Sally Ride) or manually deploy the rosette and lower to sea surface.
- On NOAA vessels:
- Tell the survey technician and deck ABs the CTD is ready - they can deploy whenever they and the bridge are ready. I usually stay on deck to lend a hand if there are any issues then once the CTD is zeroed at surface, go inside to start the 2 minute timer.
- When the weather is rough, insist the survey tech & ABs use taglines when deploying and recovering the rosette, if they are not.
- Send the CTD down to 10m - be sure there is at least 15m of bottom before sending the package down to 10m by checking the bottom depth before deployment.
- Once inside, start the 2min timer. On vessels with echosounder: check the Knudsen for a bottom depth otherwise ask for a bottom depth from the acoustics or survey tech. Use the clipboard "cheatsheet" to estimate where bottom should be and record the bottom depth if reasonable
Since 1993, the CalCOFI program has deployed a Seabird 911 CTD mounted on a 24-bottle rosette during seasonal, quarterly cruises off California. The CTD-rosette is lowered into the ocean to 515m, depth-permitting, on 75 hydrographic stations using the ship's conductive-wire winch. Data from the sensors are transmitted up the conductive wire and displayed real-time on a data aquistion computer. Discrete seawater samples are collected in 10L bottles at specific depths determined by the chlorophyll maximum and mixed layer depth. These samples are analyzed at sea and used to assess the CTD sensor data quality plus measure additional properties. Processed CTD sensor data are compared to the seawater sample data and corrected when necessary. Preliminary data are available on CalCOFI's website, calcofi.com, while the cruise is at sea when internet is available. Preliminary processed data files are online shortly after the cruise returns. Final, publication-quality bottle & CTD data are available once the bottle data have been fully processed & scrutinized.